ClickFunnels has tools for you to run all types of webinars and includes plenty of ways to monetize them.
The only caveat is that you have to be okay with using a funnel to set up and launch your webinar.
Key Takeaways:
- ClickFunnels has a complete webinar funnel framework for use
- You can run evergreen, live, paid, and free webinars
- Attach offers and upsells to webinars for increased monetization opportunities
ClickFunnels Evergreen Webinar vs. Live Webinar

If you’re wondering whether ClickFunnels supports live webinars, the answer is yes—but with one drawback. The platform does not have a native livestream tool, so you have to link with an external one, such as Zoom.
Evergreen webinars are no problem since they consist of a pre-recorded video.
It’s up to you to decide which type of webinar is best for your business, but a general rule of thumb is to:
- Pick a live webinar if you require direct interaction with your audience or to run Q&A sessions, or
- Go for the evergreen webinar if you’re delivering straightforward information that doesn’t require a live presence.

Here are a couple of things to be aware of:
- You can create and launch unlimited webinar funnels regardless of your chosen ClickFunnels plan.
- Evergreen webinars have no limits on the number of attendees.
- Live webinar attendees are limited to whatever tool you use for the job. For instance, if you use Zoom and subscribe to the Pro plan, you can host webinars with up to 100 attendees.
- Your webinars can be paid or free, and (because this is ClickFunnels), you can include upsells, order bumps, etc.
The ClickFunnels Webinar Funnel Options

All your ClickFunnels webinars start with a funnel, and you can’t run one without using one.
Don’t worry, you don’t have to start from scratch. The platform helpfully has prebuilt funnel templates to help you get set up and running quickly.
Now, there are two ways to get a prebuilt webinar funnel. In the Funnels tab, you can:
- Click Create Funnel and choose the webinar template.
- Click Smart Funnel Builder and pick the webinar funnel type.
Standard Webinar Funnel Template
First, let’s look at the Create Funnel option. The webinar funnel contains three key steps:
- The webinar registration page
- The confirmation page
- The webinar broadcast page

This automatically guides customers through the process from start to finish. However, if you want the webinar to be paid, you will have to add a sales page step to complete the process.
You may also want to include a thank-you page and even a webinar replay step if you want to give people a way to access the content after the session has finished.

Overall, this is a basic setup that only contains the essential components you might need. But it’s a good place for beginners to start, especially if you’re running free webinars.
If you prefer a more complete setup, choose the second option.
Smart Webinar Funnel Builder

Using the smart builder generates a semi-customized funnel. You can pick a few design elements upfront and tell the system what your webinar is about, and the AI will generate a funnel design on your behalf.
The key difference, though, is that the smart webinar funnel comes with more steps. You get:
- The webinar registration page
- The confirmation page
- The webinar broadcast page
- A post-webinar offer page
- An order thank you page
Therefore, you should use this one if you plan to include a paid offer with your webinar. The setup is a little more complex, but it’s the one to use if you’re using webinars to sell a product or service.
The Secret Third Option: ClickFunnels Webinar Framework

If you find funnels confusing and complicated (don’t worry, you’re definitely not alone), there’s a way to set up the entire webinar funnel in one go.
This includes everything from the countdown timer and event setup to email reminder sequences, automations, and more.
Honestly, this is the easiest and fastest way to set up a complete webinar funnel (with all the bells and whistles), so I recommend using it if you don’t want to try to figure it all out on your own.
But (and it’s a big but), you do have to be completely used to how ClickFunnels works to know how to use it properly. If you’re not, start with something more basic until you understand the mechanics of ClickFunnels.

Now, I had to dig around a bit to find the framework because it’s not available from within your account.
However, you can grab it here (you’re welcome!). Just make sure you’re logged into your ClickFunnels account before importing it.
The framework is also more detailed than the previous two templates. Here’s what you get:
- The webinar registration page
- VIP upgrade page
- The confirmation page
- The webinar broadcast page
- A post-webinar offer page
- An order thank you page
So, rather than having just one offer displayed at the end of the webinar, this also has a paid offer displayed before the webinar takes place.
How to Set Up a ClickFunnels Webinar (A Quick Guide)
Okay, so I’m going to keep this really, really simple and use the basic webinar template for this guide.
If you’ve never set up a webinar in ClickFunnels before, this is a good place to start because it allows you to get used to how the funnel steps work without adding in extra, more complicated elements.
Begin with this, then, when you feel comfortable, move on to the more advanced smart funnel or funnel framework options.
Please note that this is for a free, evergreen webinar.
First things first, you need to load up the webinar template.
Head to the Funnels tab and select the Webinar Funnel. Pick your preferred design and then click to Customize. The funnel will open up onto the workflow screen.
Now, hover your mouse over the thumbnail image of the opt-in step and click Edit.
You can now start customizing the page with your design, branding, message, and so on. Note that the opt-in page features a pop-up that’s triggered when a user clicks the call-to-action button.
When a user completes the form displayed in the pop-up, it triggers the next step of the funnel.
After you’ve finished customizing the opt-in page, you can move on to editing the confirmation page.

This page is where you add all the webinar details, including the link. Or, if it’s a bookable event, you can display the calendar and available slots.
However, if you’re running a free, prerecorded webinar, you can simply add a button that links to the broadcast page. That way, participants can easily click, enter, and watch the webinar.

The broadcast page is where you can add the link for your prerecorded webinar.
Click on the video element on the screen. This opens up the right-hand editing menu where you can insert the link for your prerecorded video.
ClickFunnels accepts videos hosted on YouTube, Voomly, Wistia, or Vimeo. Unfortunately, for some reason, you can’t upload videos directly to ClickFunnels.
It’s a good idea to toggle Autoplay to the on position so the video starts playing as soon as the participants enter the broadcast room.
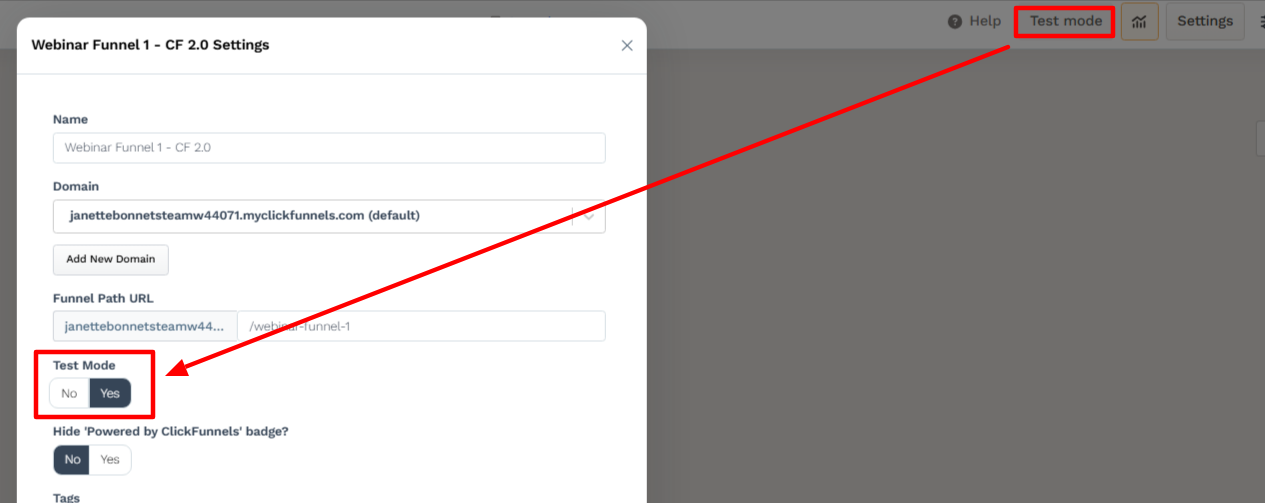
When your webinar funnel is complete and ready, click the Settings button found in the funnel workflow screen. Toggle it out of test mode, and your funnel will be live and ready for use.
4 Tips to Level Up Your ClickFunnels Webinars
1. Use Countdown Timers

Adding a countdown timer to your opt-in page is a great way to convey scarcity and urgency.
If the timescale is short, it prompts interested individuals to sign up right away, rather than leaving it for another day.
You can do this by selecting the Countdown element in the page editor and placing it in a prominent position.

Then, you have three options in terms of how the timer counts down:
- You can link it to a calendar event. The timer will sync to the start date and time of the event and count down accordingly. Use this for one-off live webinars.
- The Countdown option simply lets you choose an end date and time for the countdown. This is useful if you want your webinar offer to expire after a certain period.
- The Evergreen option allows the timers to reset at predetermined intervals. So, the countdown never really ends; it just cycles through each interval. This is the one to use if you’re running evergreen webinars.
2. Include a VIP Upgrade

Upgrades give you the opportunity to present a high-value offer to your webinar attendees after they have registered for the event.
Upgrades can be anything you like. A live one-to-one session, a relevant course, or access to an exclusive community are a few ideas you could use.
Make sure that the upgrade is closely related to the webinar content; otherwise, it won’t be effective or appealing. The upgrade should feel like a natural next step for attendees who are genuinely interested in what you’re presenting.

To add an upgrade, you can include an extra step in your webinar funnel between the opt-in and confirmation pages.
There are lots of one-time-offer page templates, so pick one you like and edit it accordingly.
3. Send Follow-up Offers

Many people use free webinars as an effective way to segue into a paid offer. The point is that you provide something of high value upfront at no cost.
The webinar hooks people in and gets them excited about what you and your business are about. That then paves the way for you to present a paid offer that your audience is already primed to buy.

There are two ways to send a follow-up offer:
- The first is to add a new funnel step after the broadcast page. Once the webinar has finished, the audience will be automatically directed to the sales page containing your offer.
- The second is to kick off an automated email sequence containing your offer. You can do this by setting up a workflow alongside your funnel that triggers the email once an opt-in form has been completed or the webinar has finished.
For maximum effect, do both.
Those who are ready to buy there and then can easily do so, while those who need a little more time get the opportunity to purchase later via your emails.
4. Automate Evergreen Webinars

Evergreen webinars have the advantage that you don’t have to be physically present when they are running. Therefore, you can pretty much run them 24/7 and maximize your audience exposure.
Automating an evergreen webinar’s runtime is as simple as creating a calendar event on your opt-in page. Instead of selecting a one-time event, pick recurring. Then, choose how often you want the webinar to recur.
You can then include the countdown timer and connect it to the calendar event so the page visitor knows how long it will be before the next webinar starts.
Frequently Asked Questions
Does ClickFunnels Have a Native Livestream Feature?
No, ClickFunnels does not have a native livestream feature. However, you can run live webinars using ClickFunnels. To do this, you must use an external tool like Zoom and link it to your webinar funnel.
Can I Monetize Webinars Using ClickFunnels?
Yes, you can monetize your webinars using ClickFunnels. You can do this by running paid webinars or by including additional offers and upsells before or after the webinar has been broadcast.
How Many Webinars Can I Run in ClickFunnels?
You can run an unlimited number of evergreen webinars in ClickFunnels. Live webinars are not limited, either, but since you have to use an external tool for live sessions, the platform and plan you choose might impose limits.